Android
Android is an open source and Linux-based Operating System for mobile devices.
Activities
In Android, an Activity is a single screen that users interact with in an app. It serves as a container for the user interface and handles user actions. Each activity has a lifecycle (e.g., onCreate(), onResume(), onDestroy()) that manages how it behaves as the user navigates the app. While older apps use multiple activities for different screens, modern apps often use a single activity with multiple composables or fragments for navigation.
Activity Lifecycle
The Activity Lifecycle in Android describes how an activity changes states during its existence. Key lifecycle methods include onCreate(), onStart(), onResume(), onPause(), onStop(), and onDestroy(). These methods are called by the system as the activity is created, becomes visible, interacts with the user, or is closed. Managing these states properly helps ensure smooth performance and efficient resource usage. (See diagram below for the lifecycle flow.)
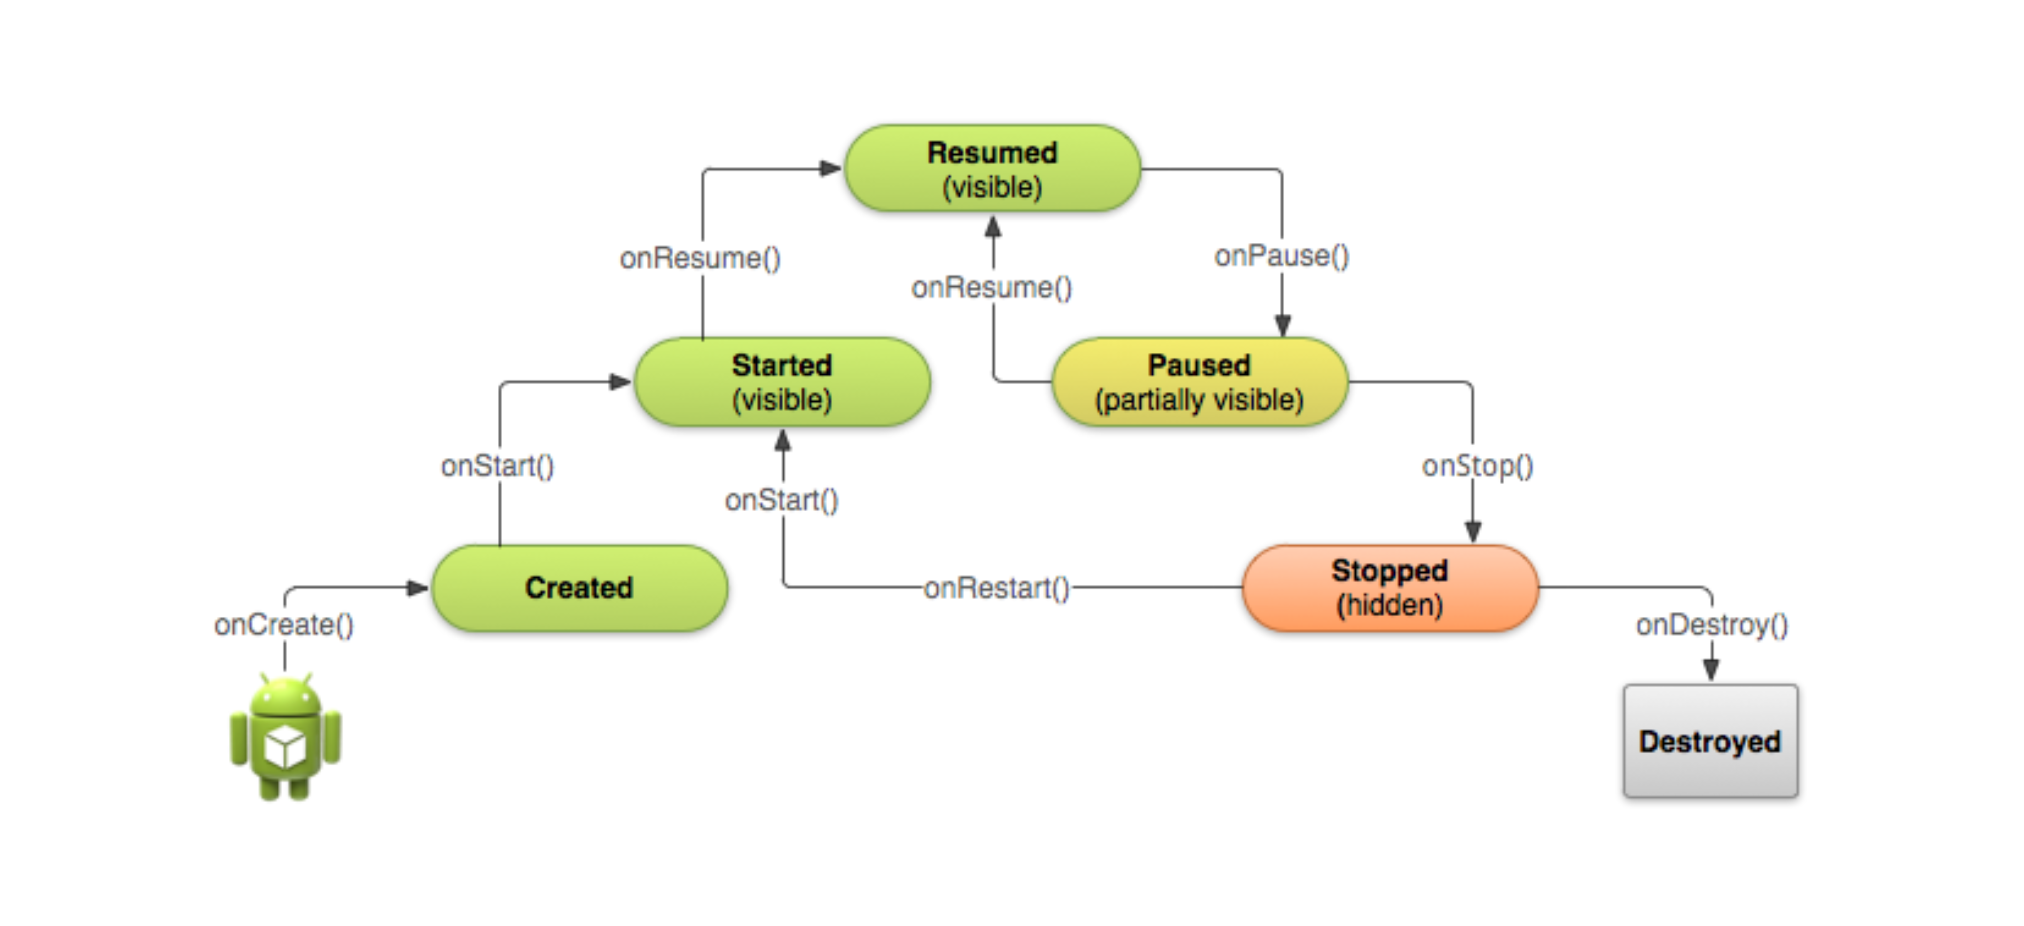
onCreate()
onCreate() is the first callback in an Activity’s lifecycle. It’s called when the Activity is first created. In the onCreate() method, perform basic application startup logic that happens only once for the entire life of the activity.
onStart()
onStart() is called after onCreate() and right before the activity becomes visible. Although the activity is not yet interactive, it’s now in the foreground. This method is used to prepare the activity to enter the active state, such as starting UI updates or getting resources needed while the activity is visible.
onResume()
The onResume() method is called when the activity becomes interactive and fully visible to the user. It’s used to resume any paused processes, such as animations, media playback, or sensor listeners. This method is called every time the activity comes to the foreground, making it ideal for refreshing content or UI elements.
onPause()
onPause() is triggered when another activity is coming into the foreground, and the current activity is about to go into the background. Although still partially visible, the activity is no longer in focus. Use this method to pause operations like video playback or game loops and to save temporary data.
onStop()
The onStop() method is called when the activity is no longer visible to the user. It’s a good place to release heavy resources, stop background tasks, or unregister components that aren’t needed when the activity isn’t visible. It helps reduce memory and power usage when the app is in the background.
onRestart()
onRestart() is called when a stopped activity is about to start again. It follows onStop() and comes before onStart(). This method is useful for re-initializing components or refreshing data that may have changed while the activity was not visible.
onDestroy()
The onDestroy() method is the final callback before the activity is destroyed. It is called when the user finishes the activity or the system removes it to free up resources. This is where you should clean up memory, close connections, and ensure there are no resource leaks.
Cnfiguration Change
A configuration change in Android occurs when there is a significant change in the device’s environment that can impact the app’s user interface or resources. Common examples include rotating the device (such as switching from portrait to landscape), changing the system language, or switching between light and dark themes. Android treats this as a configuration change, and by default, it destroys and recreates the current activity.
Configuration changes can be handle in two main ways:
- Let Android handle it (default) and save/restore state using
onSaveInstanceState()andonRestoreInstanceState(). - Handle it manually by declaring in the manifest:
android:configChanges="orientation|screenSize"
This prevents the activity from being destroyed, and you manually update the UI as needed in onConfigurationChanged()
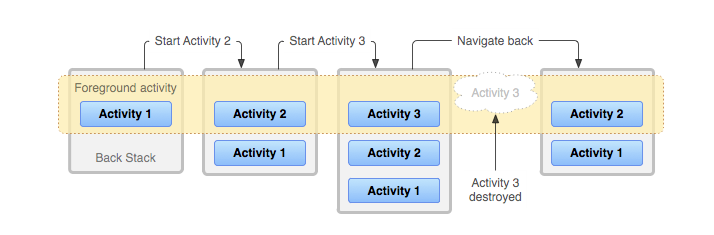
Tasks & Back Stack
A task is a collection of activities that users interact with when trying to do something in your app. These activities are arranged in a stack called the back stack in the order in which each activity is opened.
Launch Modes
Launch modes in Android define how activities are launched and how they behave within the task stack. They determine whether a new instance of an activity is created or an existing one is reused when the activity is started. You can specify an activity’s launch mode by using the launchMode attribute within the
1
<activity android:launchMode = [“standard” | “singleTop” | “singleTask” | “singleInstance”] ../>
Types of Launch Modes
- standard
- singleTop
- singleTask
- singleInstance
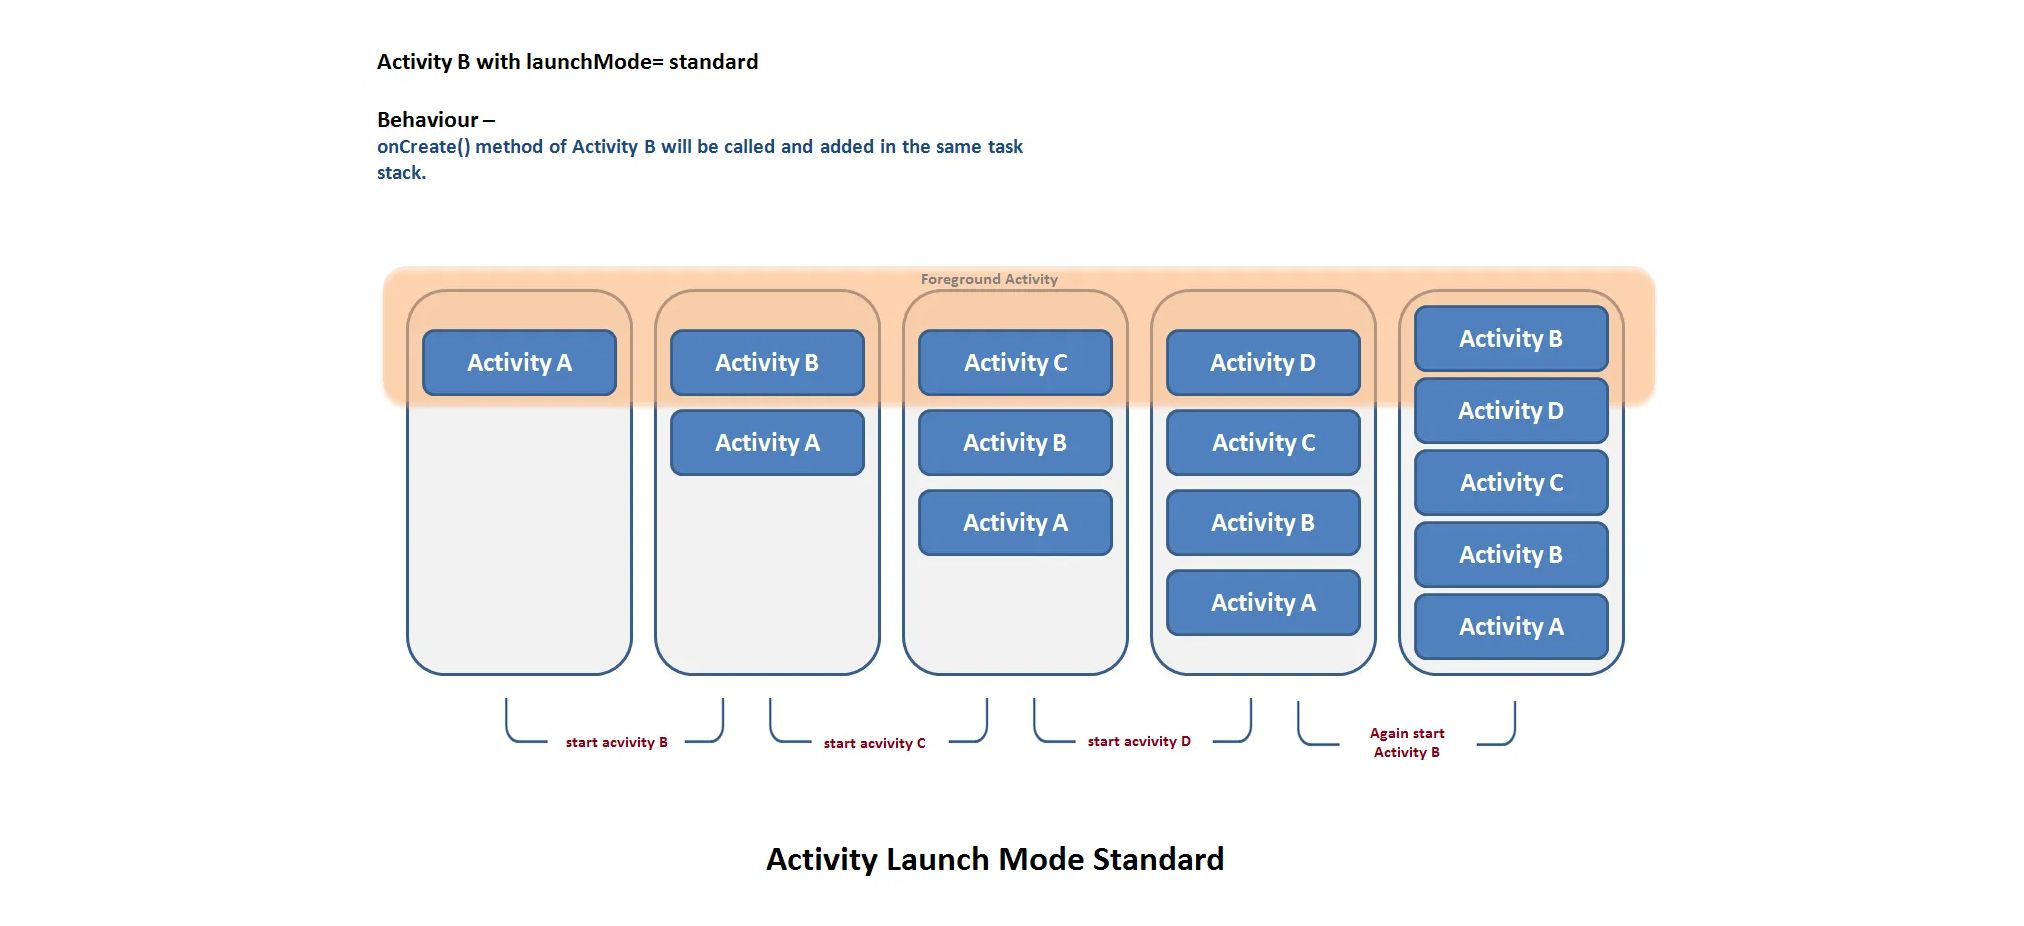
1. standard
This is the default launch mode of an activity (If not specified). It creates a new instance of an activity in the task from which it was started. Multiple instances of the activity can be created and multiple instances can be added to the same or different tasks. In other words you can create the same activity multiple times in the same task as well as in different tasks.
1
<activity android:launchMode=”standard” />
2. singleTop
In this launch mode if an instance of activity already exists at the top of the current task, a new instance will not be created and Android system will route the intent information through onNewIntent(). If an instance is not present on top of task then new instance will be created.
Using this launch mode you can create multiple instance of the same activity in the same task or in different tasks only if the same instance does not already exist at the top of stack.
1
<activity android:launchMode=”singleTop” />

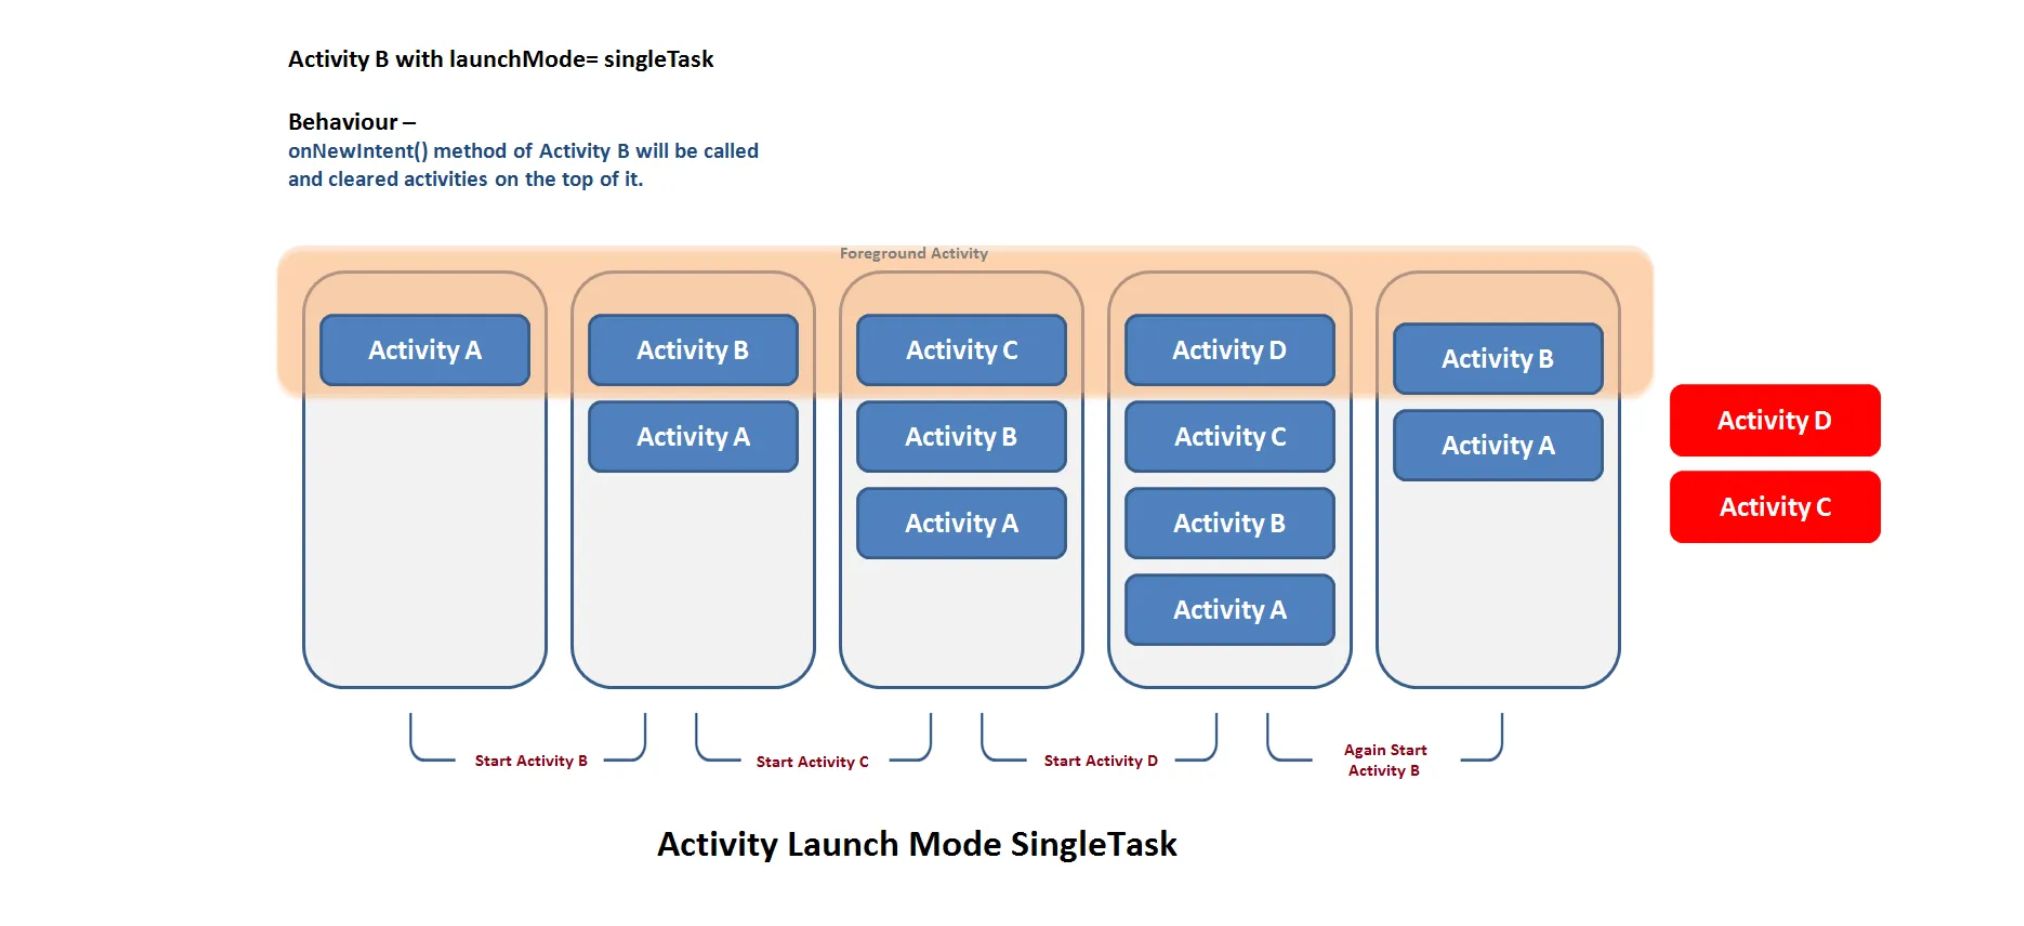
3. singleTask
In this launch mode a new task will always be created and a new instance will be pushed to the task as the root one. If an instance of activity exists on the separate task, a new instance will not be created and Android system routes the intent information through onNewIntent() method. At a time only one instance of activity will exist.
1
<activity android:launchMode=”singleTask” />
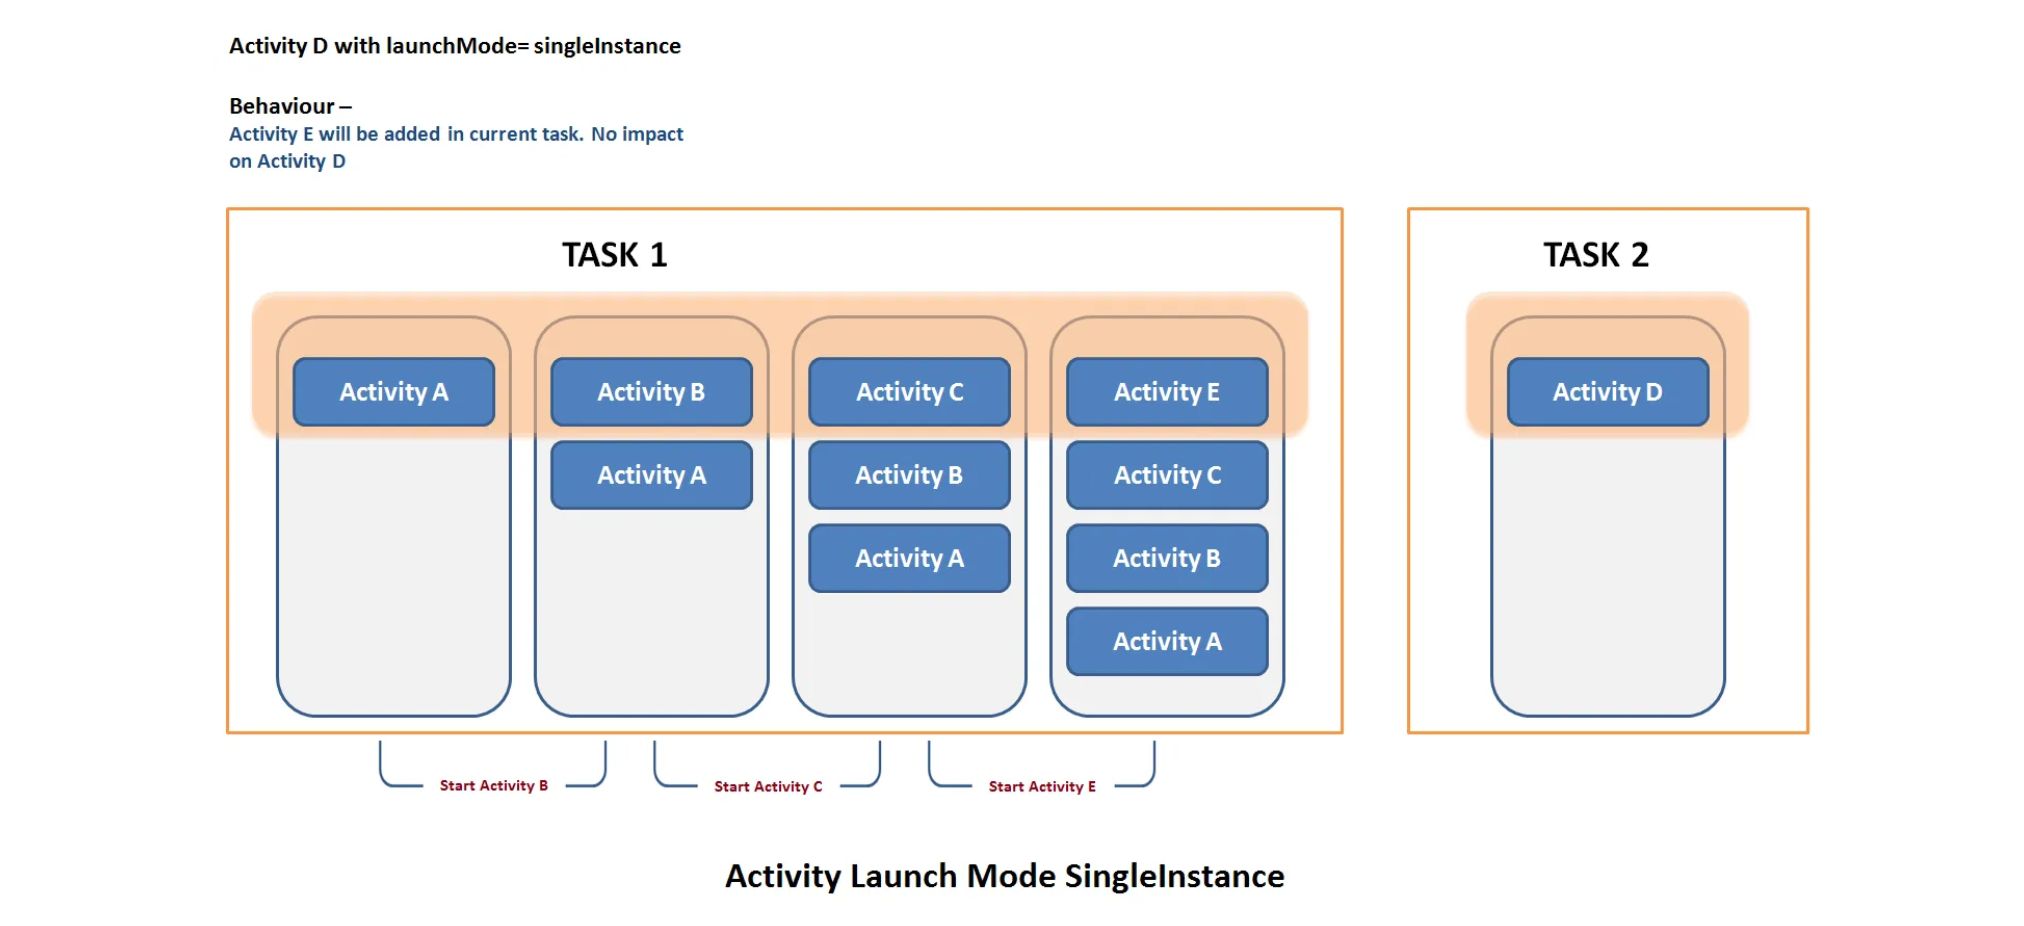
4. singleInstance
This is very special launch mode and only used in the applications that has only one activity. It is similar to singleTask except that no other activities will be created in the same task. Any other activity started from here will create in a new task.
1
<activity android:launchMode=”singleInstance” />
ViewModels
A ViewModel is a class designed to store and manage UI-related data in a lifecycle-conscious way. It allows data to survive configuration changes such as screen rotations, making it ideal for managing UI state in Android apps.
Create ViewModels
Here’s how to define a simple ViewModel that holds and updates a background color:
1
2
3
4
5
6
7
8
class HomeViewModel : ViewModel() {
    var backgroundColor by mutableStateOf(Color.White)
        private set

    fun onBackgroundChangeClick() {
        backgroundColor = Color.Red
    }
}
mutableStateOfis a Compose feature that creates observable state.byandgetValue/setValueautomatically notify Compose to recompose when state changes.- The
private setrestricts modification of backgroundColor from outside the ViewModel.
Use ViewModel in an Screen
Below is an example of how to use this ViewModel in an Activity using Jetpack Compose:
1
2
3
4
5
6
7
8
9
10
11
12
13
14
15
16
17
18
19
20
class MainActivity : ComponentActivity() {

    private val viewModel by viewModels<HomeViewModel>()

    override fun onCreate(savedInstanceState: Bundle?) {
        super.onCreate(savedInstanceState)
        setContent {
            AppTheme {
                Surface(
                    modifier = Modifier.fillMaxSize(),
                    color = viewModel.backgroundColor
                ) {
                    Button(onClick = { viewModel.onBackgroundChangeClick() }) {
                        Text("Change Background")
                    }
                }
            }
        }
    }
}
by viewModels() to obtain the ViewModel instance tied to the Activity lifecycle.
App & Activity Context
In Android, Context means the current state or environment of your app. It gives access to resources (like strings, images), system services (like location, connectivity), and helps perform actions like launching activities or showing toasts.
There are two main types of Context:
- Activity Context: Tied to an Activity. Use it when doing UI-related tasks (like showing a dialog or toast).
- Application Context: Tied to the whole app. Use it for long-term operations like accessing a database or starting a background service.
Use Activity Context for UI, and Application Context for non-UI tasks.
Keeping Activity Context for too long can cause memory leaks.
Resources & Qualifiers
In Android development, Resources and Qualifiers are used to provide different assets (like layouts, images, and strings) tailored for different devices, screen sizes, locales, etc.
What are Resources?
- Resources are files like texts, images, colors, Font or layouts used in an app.
What are Qualifiers?
- Qualifiers let us create different versions of resources for different devices.
Common Qualifiers: Screen size, Language, Orientation, Night mode, Screen width, Android version etc.
Example:
1
2
3
res/layout/activity_main.xml         → for normal phones
res/layout-large/activity_main.xml   → for large tablets
res/layout-land/activity_main.xml    → for landscape mode
Android will automatically choose the right one based on the device.
Intents & Intent Filters
An Intent in Android is a message used to do something, like open a new screen, start another app, or send data. It helps different parts of an app (or different apps) communicate and work together. Intents are used to start activities, start services, or deliver a broadcast.
Types of Intents
- Explicit Intent
- Implicit Intent
1. Explicit Intent
An explicit intent specifies the exact component (e.g., Activity, Service) to start. It is commonly used to start an activity within the same application.
Example 1: Start a Activity
1
2
3
// From MainActivity.kt, open SecondActivity
val intent = Intent(this, SecondActivity::class.java)
startActivity(intent)
Example 2: Passing Data to Another Activity
1
2
3
4
5
// Sending a username to SecondActivity
val intent = Intent(this, SecondActivity::class.java)
intent.putExtra("username", "tawhidmonowar")
intent.putExtra("age", 25)
startActivity(intent)
Retrieve data passed from MainActivity
1
2
3
4
5
6
7
8
9
10
11
12
13
14
class SecondActivity : AppCompatActivity() {

    override fun onCreate(savedInstanceState: Bundle?) {
        super.onCreate(savedInstanceState)
        setContentView(R.layout.activity_second)

        // Retrieve data passed from MainActivity
        val username = intent.getStringExtra("username")
        val age = intent.getIntExtra("age", 0) // 0 is default value if not found

        // Now you can use the data (e.g., display in TextView, log it, etc.)
        println("Username: $username, Age: $age")
    }
}
2. Implicit Intent
An Implicit Intent does not specify a particular component. Instead, it describes an action (e.g., opening a link, sharing text) and lets the system find the best app to handle it.
Example 1: Opening a Website in a Browser
1
2
3
val intent = Intent(Intent.ACTION_VIEW)
intent.data = Uri.parse("https://www.google.com")
startActivity(intent)
Example 2: Sharing Text with Another App
1
2
3
4
val sendIntent = Intent(Intent.ACTION_SEND)
sendIntent.type = "text/plain"
sendIntent.putExtra(Intent.EXTRA_TEXT, "Check out this cool app!")
startActivity(Intent.createChooser(sendIntent, "Share via"))
This opens a dialog letting the user choose between WhatsApp, Gmail, Messages, etc.
Intent Filters
Intent filters are declarations in the Android AndroidManifest.xml that specify what types of intents an app component can handle. They are used with implicit intents.
Example: Handle a Custom URL (Deep Link)
1
2
3
4
5
6
7
8
9
10
11
12
13
14
15
16
17
18
19
20
<application
    android:label="MyApp"
    android:theme="@style/Theme.MyApp">

    <activity android:name=".MainActivity">
        <intent-filter>
            <!-- This makes the app respond to links -->
            <action android:name="android.intent.action.VIEW" />
            <category android:name="android.intent.category.DEFAULT" />
            <category android:name="android.intent.category.BROWSABLE" />

            <!-- This defines what kind of links we want -->
            <data
                android:scheme="https"
                android:host="www.example.com"
                android:pathPrefix="/open" />
        </intent-filter>
    </activity>

</application>
Explanation:
- If someone opens a URL like
https://www.example.com/open/anything - app will open and run
MainActivity.
1
2
3
4
5
6
7
8
9
10
11
12
13
14
15
16
17
class MainActivity : ComponentActivity() {

    override fun onCreate(savedInstanceState: Bundle?) {
        super.onCreate(savedInstanceState)

        val link = intent?.data?.toString() ?: "App opened normally"

        setContent {
            MyAppTheme {
                Text(
                    text = link,
                    style = MaterialTheme.typography.bodyLarge
                )
            }
        }
    }
}
Explanation:
- When the app is opened from a link, we grab the link (
intent.data). - We show that link in a simple
TextView.
Broadcasts
A Broadcast is a message that can be sent by the system or an app to notify other apps or components about events like:
Battery low, Screen turned on/off, Airplane mode enabled, SMS received, Custom app events
Types of Broadcasts
- System Broadcasts
- Custom Broadcasts
System Broadcasts
Sent by the Android system (e.g., ACTION_BOOT_COMPLETED, ACTION_BATTERY_LOW).
Example:
1
val intentFilter = IntentFilter(Intent.ACTION_BATTERY_LOW)
Custom Broadcasts
Sent by apps for internal or inter-app communication.
Example:
1
2
val intent = Intent("com.example.MY_CUSTOM_ACTION")
sendBroadcast(intent)
Broadcast Receivers
A Broadcast Receiver is a component that listens for and responds to broadcast messages.
Type of Receivers
- Static (Manifest-declared) Receiver
- Dynamic Receivers
Static Receiver
It is defined in the AndroidManifest.xml file and can respond to broadcasts even when the app is not running, making it ideal for system events like device boot completion (ACTION_BOOT_COMPLETED).
Example:
1
2
3
4
5
<receiver android:name=".MyBootReceiver">
    <intent-filter>
        <action android:name="android.intent.action.BOOT_COMPLETED" />
    </intent-filter>
</receiver>
1
2
3
4
5
6
7
class BootReceiver : BroadcastReceiver() {
    override fun onReceive(context: Context?, intent: Intent?) {
        if (intent?.action == Intent.ACTION_BOOT_COMPLETED) {
            Toast.makeText(context, "Device Booted!", Toast.LENGTH_SHORT).show()
        }
    }
}
Dynamic Receivers
It is declared and managed programmatically within an Activity or Service. Unlike static receivers, it only works while the app is running, making it perfect for handling app-specific events (like custom broadcasts or UI updates). Since it’s tied to a component’s lifecycle, you must register it in onCreate() and unregister it in onDestroy() to prevent memory leaks.
Example:
1
2
3
4
5
6
7
8
//Receiver App
class SmsReceiver: BroadcastReceiver() {
    override fun onReceive(context: Context?, intent: Intent?) {
        if(intent?.action == "android.provider.Telephony.SMS_RECEIVED") { // it's best practice to verify intent action before performing any operation
            Log.i("ReceiverApp", "SMS Received")
        }
    }
}
1
2
3
4
5
6
7
8
9
10
11
12
13
14
private val smsReceiver = SmsReceiver()

override fun onCreate(savedInstanceState: Bundle?) {
    super.onCreate(savedInstanceState)
    setContentView(R.layout.activity_main)
    registerReceiver(smsReceiver,
        IntentFilter("android.provider.Telephony.SMS_RECEIVED")
    )
}

override fun onDestroy() {
    super.onDestroy()
    unregisterReceiver(smsReceiver)
}
Foreground Services
A Foreground Service in Android is a type of service that continues to run even when the user is not interacting with the app. It is used for tasks that are long-running and must remain active even if the user navigates away from the app. Unlike background services, foreground services must show a persistent notification so the user knows it’s running.
To create a foreground service, follow these steps:
1) Create the Service Class
First, we have to create a class that extends Service and override the necessary methods.
1
2
3
4
5
6
7
8
9
10
11
12
13
14
15
16
17
18
19
20
21
22
23
24
25
26
27
28
29
30
31
32
33
34
35
36
37
38
39
40
41
42
43
44
45
46
47
class MyForegroundService : Service() {

    override fun onBind(intent: Intent?): IBinder? {
        return null
    }

    override fun onCreate() {
        super.onCreate()
    }

    // This is triggered when another android component sends an Intent to this running service
    override fun onStartCommand(intent: Intent?, flags: Int, startId: Int): Int {

        // Do the work that the service needs to do here
        When (intent?.action) {
            Actions.START.toString() -> {
                // This method tells the system that a service will become a foreground service soon.
                startForegroundService()
                start() // Call start() to create the notification and start in foreground
            }
            Actions.STOP.toString() -> stopSelf()
        }

        return super.onStartCommand(intent, flags, startId)
    }

    enum class Actions {
        START, STOP
    }

    private fun start() {

        val notification = NotificationCompat.Builder(this, "ForegroundServiceChannelId")
            .setSmallIcon(R.drawable.ic_notification)
            .setContentTitle("Foreground Service")
            .setContentText("Foreground service is running")
            .build()

        // Start the service in the foreground
        startForeground(1, notification)
    }

    override fun onDestroy() {
        super.onDestroy()
        // Clean up any resources here
    }
}
2) Create ForegroundServiceChannelId in Application class
Then for android 8.0 and above we have to create our notification channel in our application class.
1
2
3
4
5
6
7
8
9
10
11
12
13
14
15
16
17
Class MyApplication: Application() {
    override fun onCreate() {
        super.onCreate()

        // Create the notification channel (required for Android 8.0 and above)
        if (android.os.Build.VERSION.SDK_INT >= android.os.Build.VERSION_CODES.O) {
            val channel = NotificationChannel(
                "ForegroundServiceChannelId",
                "Foreground Service Channel",
                NotificationManager.IMPORTANCE_DEFAULT
            )
        // service provided by Android Operating system to show notification outside of our app
        val notificationManager = getSystemService(Context.NOTIFICATION_SERVICE) as NotificationManager
        notificationManager.createNotificationChannel(channel)
        }
    }
}
3) Register the Service in the Manifest
Then we have to register our Application class and also declare our service and give permission to it in our AndroidManifest.xml file:
1
2
3
4
5
6
7
8
9
10
11
12
13
14
15
<manifest>

   <uses-permission android:name="android.permission.FOREGROUND_SERVICE" />
   <uses-permission android:name="android.permission.POST_NOTIFICATIONS" />

   <application
       android:name=".MyApplication"
       ... >
       <activity
           ...
       </activity>
       <service android:name=".MyForegroundService" android:foregroundServiceType="mediaPlayback" />
   </application>

</manifest>
4) Start and Stop the Foreground Service
Now we can write our requestPermission code and also Start and Stop our foreground service from our Main Activity or another component.
1
2
3
4
5
6
7
8
9
10
11
12
13
14
15
16
17
18
19
20
21
22
23
24
25
26
27
28
29
30
31
32
33
34
35
36
class MainActivity : AppCompatActivity() {

    override fun onCreate(savedInstanceState: Bundle?) {
        super.onCreate(savedInstanceState)

        if (android.os.Build.VERSION.SDK_INT >= android.os.Build.VERSION_CODES.T) {
            ActivityCompat.requestPermissions(
                this,
                arrayOf(Manifest.permission.POST_NOTIFICATION),
                requestCode: 0
            )
        }

        setContentView(R.layout.activity_main)

        // Start the foreground service
        Button(onClick = {
           Intent(applicationContext, MyForegroundService::class.java).also{
               it.action = MyForegroundService.Actions.START.toString()
               startService(it)
           }
        }) {
               Text(text = “Start Service”)
           }

        // Stop the foreground service
        Button(onClick = {
           Intent(applicationContext, MyForegroundService::class.java).also{
               it.action = MyForegroundService.Actions.STOP.toString()
               startService(it)
           }
        }) {
               Text(text = “Stop Service”)
           }
    }
}
Summary
A Foreground Service is crucial for running tasks that must not be interrupted, such as playing music, tracking GPS, or recording. It provides reliability and system compliance with a persistent user-facing notification.
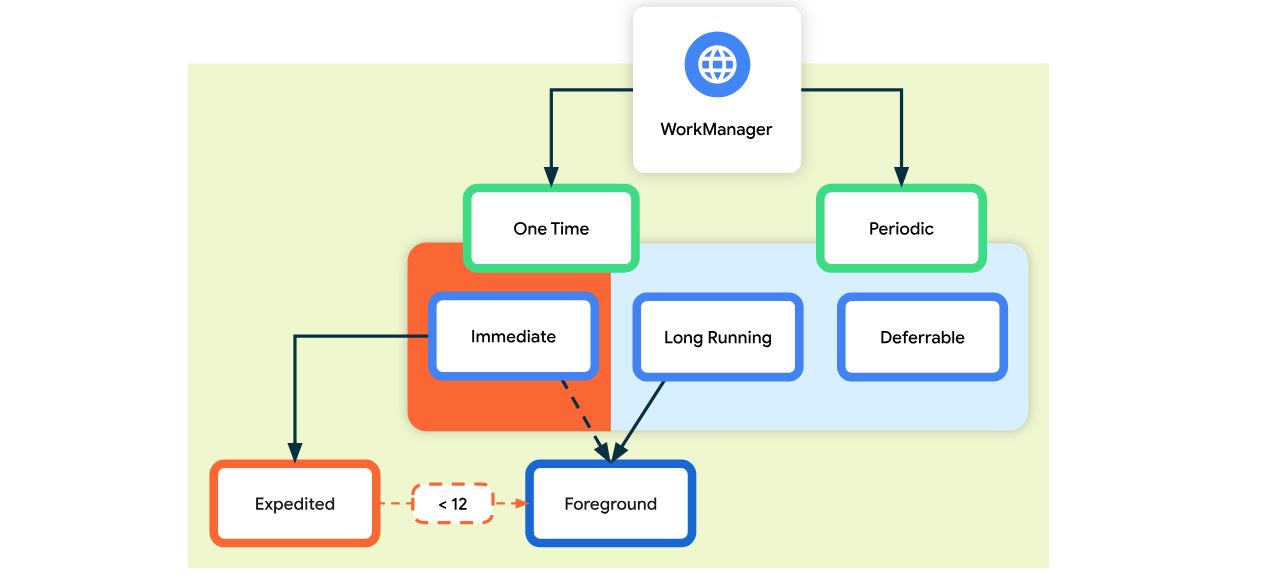
WorkManager
WorkManager is an API provided by Android Jetpack that is used to schedule deferrable, guaranteed, and asynchronous background work. It is ideal for tasks that should be executed even if the app exits or the device restarts.
Example: Uploading Logs
Step 1: Add dependencies
1
2
3
dependencies {
    implementation "androidx.work:work-runtime-ktx:2.9.0"
}
Step 2: Create a Worker
1
2
3
4
5
6
7
8
9
10
11
class UploadWorker(context: Context, params: WorkerParameters) : Worker(context, params) {
    override fun doWork(): Result {
        // Simulate upload task
        uploadLogsToServer()
        return Result.success()
    }

    private fun uploadLogsToServer() {
        // Your upload logic here
    }
}
Step 3: Enqueue the Work
1
2
val uploadRequest = OneTimeWorkRequestBuilder<UploadWorker>().build()
WorkManager.getInstance(context).enqueue(uploadRequest)
Adding Constraints (e.g., only on Wi-Fi and charging)
1
2
3
4
5
6
7
8
9
10
val constraints = Constraints.Builder()
    .setRequiredNetworkType(NetworkType.UNMETERED)
    .setRequiresCharging(true)
    .build()

val request = OneTimeWorkRequestBuilder<UploadWorker>()
    .setConstraints(constraints)
    .build()

WorkManager.getInstance(context).enqueue(request)
Periodic Work (e.g., sync every 6 hours)
1
2
3
4
5
6
7
8
9
val syncRequest = PeriodicWorkRequestBuilder<UploadWorker>(6, TimeUnit.HOURS)
    .setConstraints(constraints)
    .build()

WorkManager.getInstance(context).enqueueUniquePeriodicWork(
    "SyncWork",
    ExistingPeriodicWorkPolicy.KEEP,
    syncRequest
)
Observing Work Status (e.g., in ViewModel or Activity)
1
2
3
4
5
6
WorkManager.getInstance(context).getWorkInfoByIdLiveData(uploadRequest.id)
    .observe(this) { workInfo ->
        if (workInfo != null && workInfo.state == WorkInfo.State.SUCCEEDED) {
            // Work completed successfully
        }
    }
URIs (Unique Resource Identifier)
In simple terms, a URI is a string that uniquely identifies something. This “something” could be: • A drawable image file inside your app. • A file in internal or external storage. • A piece of shared content (like a photo in the user’s gallery). • A snippet of data embedded directly in the URI.
URIs in Android are not necessarily guaranteed to point to valid files in all cases — especially if you try to use them as if they were just file paths. Because Android enforces strict permissions and sandboxing, URIs also carry rules about who can read what resource and when.
Types of URIs
- Resource URIs
android.resource:// - File URIs
file:// - Content URIs
content:// - Data URIs
data:[mime-type];base64,…
1. Resource URIs
Resource URIs point to items (drawables, layouts, strings, etc.) that live in your app’s res/ folder. They look like: android.resource://
For example, imagine you have a drawable named “kermit.jpg” in res/drawable. You can construct a Resource URI in Kotlin like this:
1
2
3
4
5
6
7
8
9
10
// Example of constructing a Resource URI for "kermit" in the drawable folder
val packageName = context.packageName   // e.g., "com.example.myapp"
val resourceUri = Uri.parse("android.resource://$packageName/drawable/kermit")

// Example in a Jetpack Compose function or a normal Kotlin class
val contentResolver = context.contentResolver
contentResolver.openInputStream(resourceUri)?.use { inputStream ->
    val bytes = inputStream.readBytes()  // reading the raw bytes
    println("Resource file size: ${bytes.size} bytes")
}
Explanation: • android.resource:// says this URI references an Android resource. • We append our package name and state it’s located in the drawable directory with the name “kermit”. • Then, your app’s ContentResolver can open an InputStream to it.
2. File URIs
File URIs reference files on the device’s file system — often in your app’s internal storage or external storage (if you have permission). They look like: file://
Here’s a Kotlin snippet demonstrating how to save a resource to a file in your app’s internal storage, then get a File URI:
1
2
3
4
5
6
7
8
9
10
11
12
13
14
15
16
17
18
import java.io.File
import java.io.FileOutputStream

// Suppose you have some source bytes, e.g., from the "kermit" drawable above
val kermitBytes: ByteArray = ...

// Create a File that points to your app's internal storage
val file = File(context.filesDir, "kermit_copy.jpg")

// Write the bytes to this file
FileOutputStream(file).use { outputStream ->
    outputStream.write(kermitBytes)
}

// Convert the file path into a File URI
val fileUri = Uri.fromFile(file)  // "file:///data/user/0/.../files/kermit_copy.jpg"

println("File URI is: $fileUri")
Explanation:
• context.filesDir is internal storage private to your app. • Only your app can read this file, unless you explicitly share it with other apps. • fileUri can be used within your app to open or modify this file. • If you show this URI to another app that doesn’t have permission, they’ll get a FileUriExposedException.
3. Content URIs
Content URIs are the most common way to share data between apps. They look like: content://
When you launch the Android system’s image picker (the “gallery”) to select a photo, the resulting URI is usually a Content URI. This is because the gallery app grants temporary (or “on-demand”) permission for your app to read the asset.
Below is a Jetpack Compose snippet showing how to pick an image from the gallery using the Activity Result API (no additional READ_EXTERNAL_STORAGE permission required on Android 13+ for the official photo picker, but that can depend on your minimum API level):
1
2
3
4
5
6
7
8
9
10
11
12
13
14
15
16
17
18
19
@Composable
fun ImagePickerSample() {
    // Set up a launcher to pick an image from the gallery
    val pickerLauncher = rememberLauncherForActivityResult(
        contract = ActivityResultContracts.GetContent()
    ) { uri: Uri? ->
        // This is where we get the content:// URI for the chosen image
        uri?.let {
            println("Picked content URI: $it")
            // We can open it as an InputStream using ContentResolver
            // and read the image bytes if needed
        }
    }

    // Simple button to launch the picker
    Button(onClick = { pickerLauncher.launch("image/*") }) {
        Text("Pick Image")
    }
}
How does it work? • ActivityResultContracts.GetContent() opens a system UI to select a piece of content (like a photo). • The result is a Content URI (content://…) that your app can read for as long as the system permits. • If the user or the system revokes access, that URI might eventually stop working.
If you want to keep the chosen image long term inside your app, copy it to your own internal storage.
4. Data URIs
Data URIs embed the data directly in the URI string, typically in Base64 format. They look like: data:;base64,
Below is a simple example of a plain-text data URI:
1
2
3
4
val plainTextDataUri = Uri.parse("data:text/plain;charset=utf-8,Hello%20World!")
println("Data URI Scheme: ${plainTextDataUri.scheme}") // "data"
println("Data URI Content: ${plainTextDataUri.schemeSpecificPart}")
// "text/plain;charset=utf-8,Hello%20World!"
Developers rarely use data URIs for large files (like big images) because they can become huge strings that are difficult to manage. It’s more common to store large data in the res folder or in the file system.
Common Pitfalls & Best Practices
- Don’t Treat All URIs Like File Paths
- Always check the scheme of the URI (
android.resource://,file://,content://,data://) and handle it accordingly.
- Always check the scheme of the URI (
- Permissions Can Expire
- A Content URI often has time-limited permission or depends on the user’s explicit action (like picking an image). If you want permanent access, copy the data into your internal storage.
- Name Collisions in Resource URIs
- For resource URIs, be sure the drawable/string/etc. name is unique. Android merges resources with library modules, so avoid unintentional conflicts.
- Don’t Overuse File URIs for Sharing
- A File URI from your internal storage typically isn’t readable by other apps. If you want to share data, implement a FileProvider or rely on Content URIs.
- Always Validate the URI’s Existence
- A file or resource can move, get deleted, or become inaccessible. Wrap your operations in try/catch and handle cases where openInputStream might return
null.
- A file or resource can move, get deleted, or become inaccessible. Wrap your operations in try/catch and handle cases where openInputStream might return
Content Providers
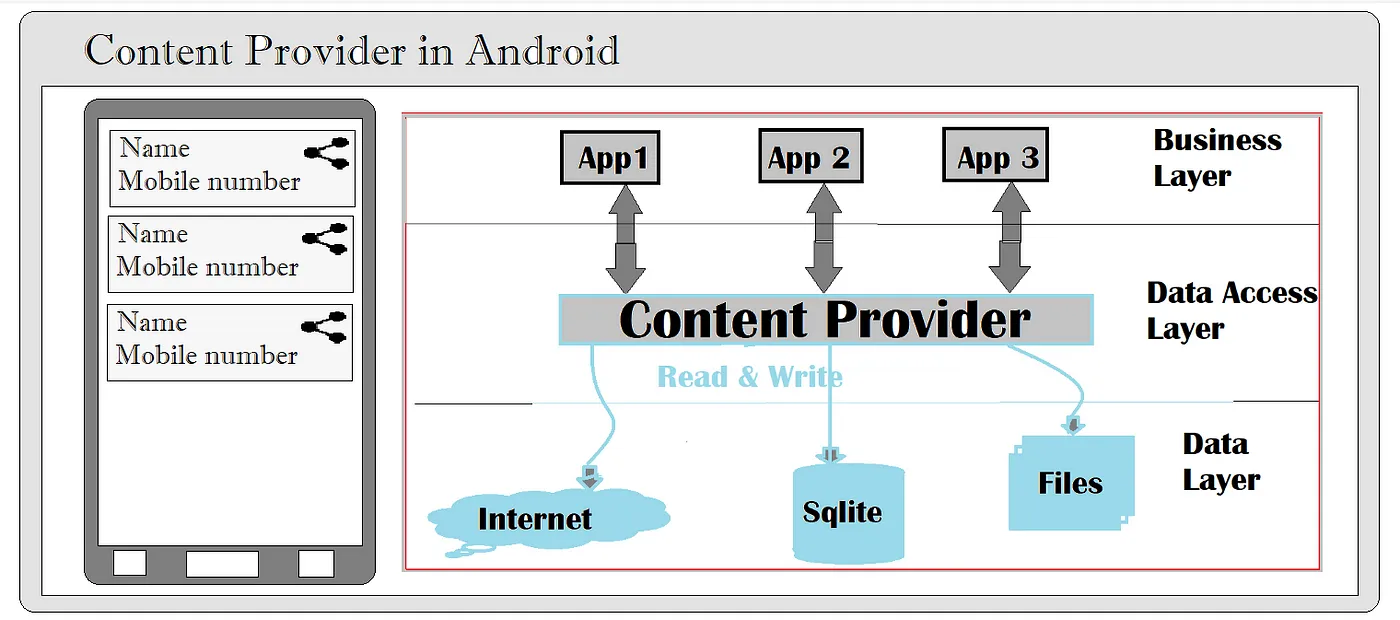
A Content Provider is a component that manages and shares app data using a URI-based interface. Content Providers make it possible to share data between different apps in a secure and consistent manner.
Use Cases
- Sharing Data Between Applications: Content Providers are essential when you want to share data across different applications, such as contacts or media.
- Managing Application Data: They can also be used within a single app to manage complex datasets.
- Providing Custom Search Suggestions: Apps can provide custom search suggestions to the system search interface via Content Providers.
Key Components of Content Providers
- URI: A Uniform Resource Identifier that points to the data source.
- ContentResolver: This class provides methods to interact with the Content Provider.
- ContentValues: A key-value pair that holds the data.
- Cursor: A pointer that accesses the result set of a query.
Implementing Content Provider
In Android, MediaStore is a system Content Provider that provides access to media files such as images, audio, and video stored on the device. We can query it using a ContentResolver to fetch images with their metadata like name, ID, and URI.
1
2
3
4
5
6
7
8
9
10
11
12
13
14
15
16
17
18
19
20
21
22
23
24
25
26
27
28
29
30
31
32
val imageList = mutableListOf<Pair<String, Uri>>() // List to store image name and URI

// Define which columns to retrieve
val projection = arrayOf(
    MediaStore.Images.Media._ID,
    MediaStore.Images.Media.DISPLAY_NAME
)

// MediaStore URI for external images
val uri = MediaStore.Images.Media.EXTERNAL_CONTENT_URI

// Query MediaStore using ContentResolver
val cursor = contentResolver.query(
    uri,                 // Content URI
    projection,          // Columns to return
    null,                // Selection clause (null = all)
    null,                // Selection arguments
    "${MediaStore.Images.Media.DATE_ADDED} DESC"  // Sort order (newest first)
)

cursor?.use {
    val idColumn = it.getColumnIndexOrThrow(MediaStore.Images.Media._ID)
    val nameColumn = it.getColumnIndexOrThrow(MediaStore.Images.Media.DISPLAY_NAME)

    while (it.moveToNext()) {
        val id = it.getLong(idColumn)
        val name = it.getString(nameColumn)
        val contentUri = ContentUris.withAppendedId(uri, id) // Builds URI for each image

        imageList.add(name to contentUri)
    }
}
Permissions Needed
For Android 13+
1
<uses-permission android:name="android.permission.READ_MEDIA_IMAGES"/>
For Android 10–12
1
<uses-permission android:name="android.permission.READ_EXTERNAL_STORAGE"/>
Conclusion
Content Providers are a powerful component in Android that enable data sharing and management. By integrating them with Jetpack Compose and Flow in the ViewModel, you can create a modern, responsive UI that observes and displays data in real-time. This approach enhances the robustness and flexibility of your app, allowing it to manage data seamlessly and efficiently.